
Note: The tutorial has been made available for free, thanks to our Patreon community. Please consider becoming a patron to support our work.
There is nothing spookier and scarier than Halloween. It’s one of my favorite festivals. Halloween gives me an opportunity to create a mystic world. Every year I build musical light set-up using open source software and hardware.
In this tutorial, I will walk you through the process of building your own musical light set-up. This year I have expanded the project. Since now I have a two-year-old son who is very curious, I moved away from 110v light to 12v safer light. I have also started using addressable RGB LED lights that allow me to have multiple color set-ups and patterns from the same strip instead of using different colors. To keep things simple, I will split the tutorial into three version, targeting three different use-cases:
- Regular 110v lights (European and Asian friends can use 220v lights)
- 12v LED powered lights
- Addressable RGB lights
What you need: the part list
To make it easier for you, here is my shopping list for Amazon.com (these are affiliate links, so please use them to support writing articles like these)
- Raspberry Pi 3
- Micro SD card (minimum 8GB)
- Vtin 20 Watt Waterproof Bluetooth Speaker
- 5v charger (2 units, one for the Pi and other for the relay)
- Male to female breadboard jumper wires
- 8-channel Solid State relay
- Male to Female breadboard jumper wire
- Wood board
- Push switch
- Soldering rod
- Hot glue gun
This year, I am using a fork of Lightshow Pi, created by Ken B. The good news is that the fork has been merged with the main project.
Getting started with Raspberry Pi 3
Raspberry Pi 3 supports many different distributions, but we are using Raspbian OS because the software packages that we need are easily available on Raspbian OS.
How to install Raspbian on Raspberry Pi 3 with SSH enabled by default.
Once you installed Raspbian OS following the above article, ‘ssh‘ into the Pi and update the system.
sudo apt-get update
sudo apt-get dist-upgrade
It’s always a good idea to reboot your system if there are any kernel updates:
sudo reboot
Install LightShowPi Software
The entire set-up and configuration will be done remotely over the local network. So ssh into your Pi then clone the Lightshowpi repository in the home directory of our Pi:
git clone https://bitbucket.org/togiles/lightshowpi.git
Then, ‘cd’ to the ‘lightshowpi’ folder:
cd lightshowpi
We will be using the master branch as it has newer features:
git fetch && git checkout master
Run the install script:
sudo ./install.sh
Shut down the system
sudo shutdown
Our base system is ready.
Connecting relays
It’s time to connect relays. We are using Solid State Relays (SSR) as they are silent and faster than the mechanical relays.
Power down the Pi and use the ‘male-female-breadboard wires’ to connect the GPIO pins with the corresponding channels of the relay.
Follow the connections on the diagram as shown below:
 <img <img <img
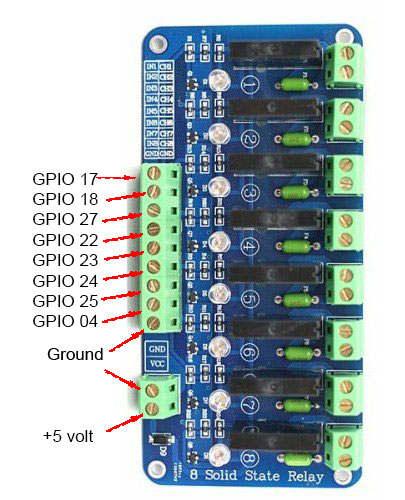
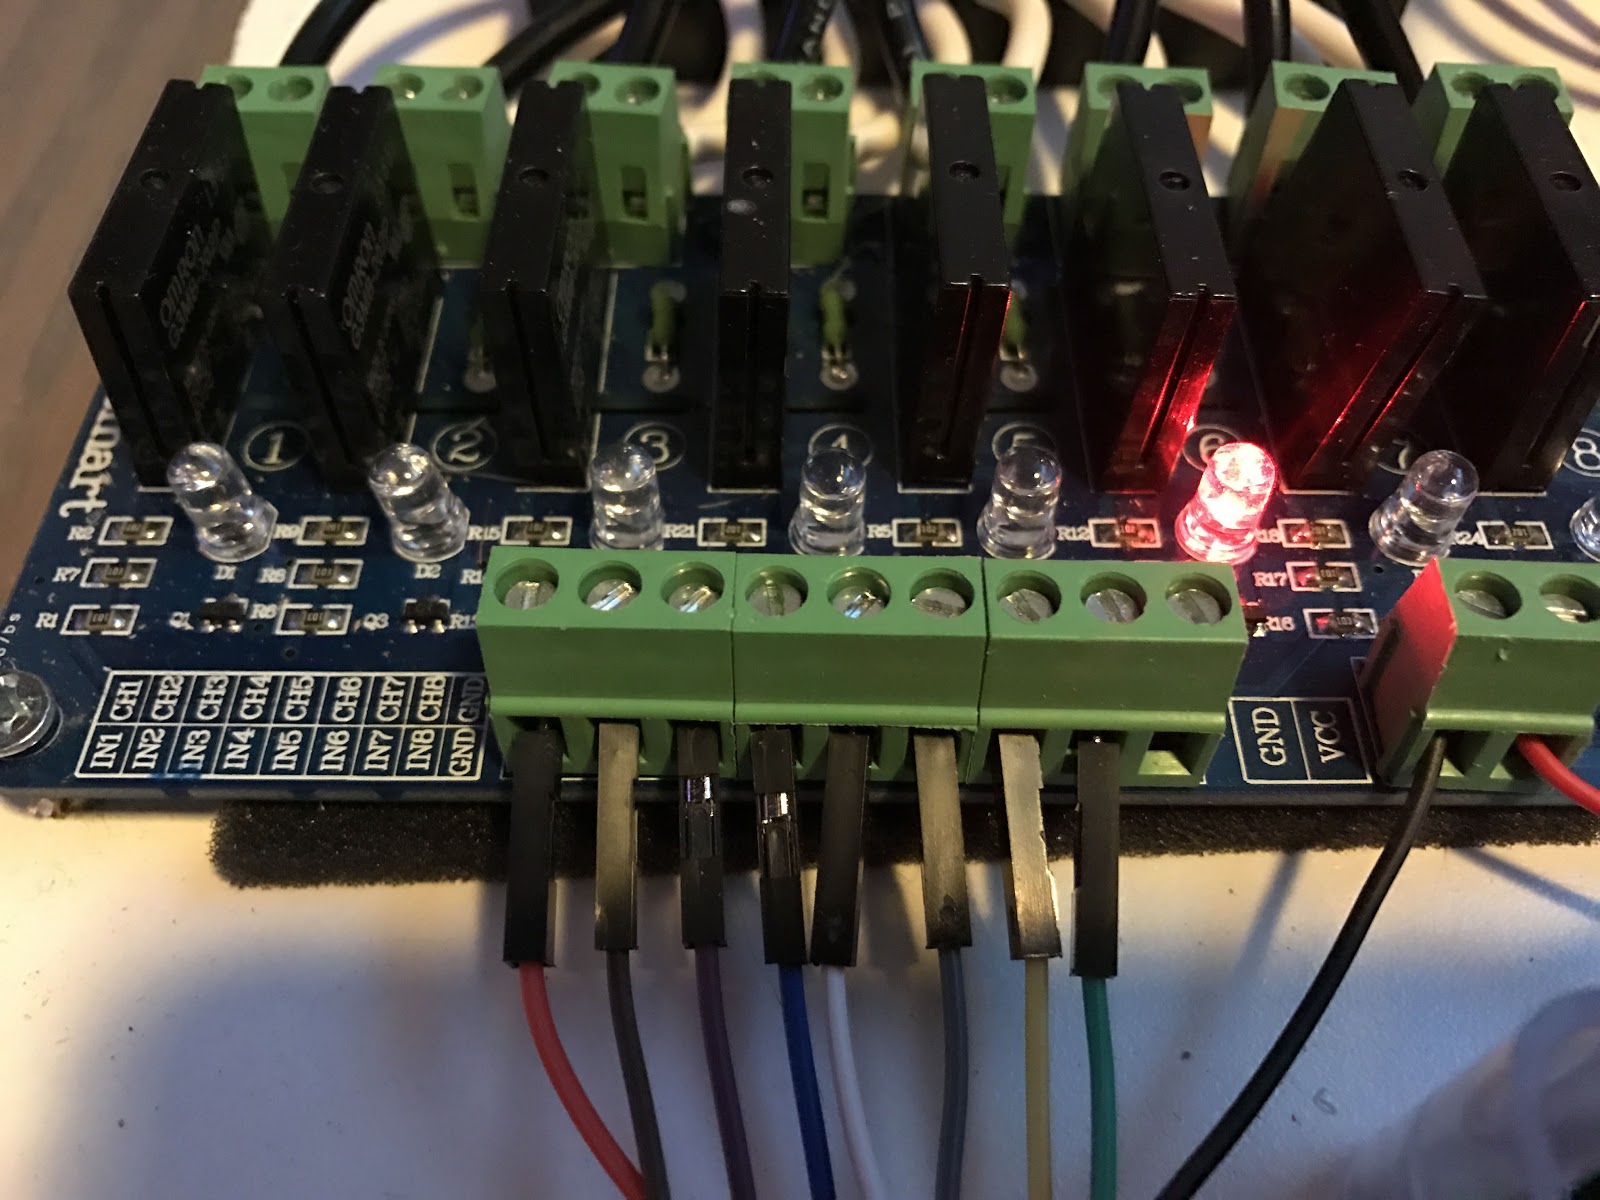
Finally, this is what it looks like:
Let’s check the relays. Turn on the Pi and SSH into it. CD into the lightshowpi directory:
cd lightshowpi
This command will trigger each channel of the relay
sudo python py/hardware_controller.py --state=flash
The command will send a signal to each GPIO pin and you must see lights on the corresponding channels of the relay. Once all 8 channels are checked, stop the test with ‘Ctrl+c’.
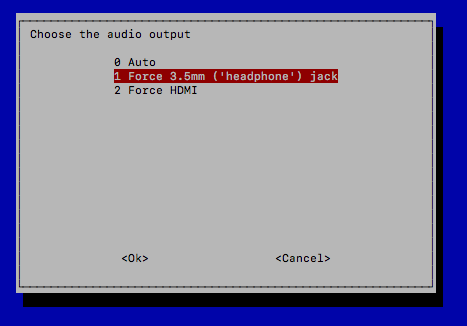
It’s time to test music. Let’s configure sound output from the 3.5mm jack on Raspberry Pi.
raspi-config
Then go to advanced settings and force audio out from 3.5mm jack.
There is some sample music stored in the music directory of the lightshowpi project. CD to lightshowpi directory
cd lightshowpi
Then run this command:
sudo python py/synchronized_lights.py --file=/home/pi/lightshowpi/music/sample/ovenrake_deck-the-halls.mp3
If you hear music and Relay lights flashing, congratulations.
Final showdown
Let’s get ready for the final show. First of all, we need to create a playlist of your favorite music. You can use .mp3 music that you purchased from Amazon or Apple Music; or ripped it from CDs. Then rsync those music files to the ‘music’ directory of lightshowpi.
Let’s create a folder within the music directory so we can better organize the music if we use the same device for different occasions. I use my set-up for both Halloween and Christmas and I keep music in separate directories and point at the appropriate directory, depending on the season.
Let’s create a folder called ‘christmas’ inside /home/pi/lightshowpi/music:
cd lightshowpi/music/
mkdir christmas
I placed all the must I needed in a folder on my local machine and then rsynced that music to the Christmas directory.
rsync -avzP --delete /home/swapnil/Music/best_christmas/ [email protected]:/home/pi/lightshowpi/music/christmas/
Once the music is successfully transferred, verify the transfer on Pi.
ls /home/pi/lightshowpi/music/christmas
You should see your music here. Let’s create a playlist to automate playback.
python /home/pi/lightshowpi/tools/playlist_generator.py
When asked, type the absolute path of the music folder, which in my case was:
/home/pi/lightshowpi/music/christmas/
Then verify the creation of playlist:
cat /home/pi/lightshowpi/music/christmas/.playlist
Create a new config file named overrides.cfg from defaults.cfg.
cp /home/pi/lightshowpi/config/defaults.cfg /home/pi/lightshowpi/config/overrides.cfg
Let’s create an entry for the playlist in the config file:
nano /home/pi/lightshowpi/config/overrides.cfg
Scroll down to the [lightshow] section, comment the default playlist path and add a new one to reflect our music directory. It should look like this:
playlist_path = $SYNCHRONIZED_LIGHTS_HOME/music/sample/.playlist
Change it to point to your music directory:
playlist_path = $SYNCHRONIZED_LIGHTS_HOME/music/christmas/.playlist
Save and close the file with Ctrl+x.
Now test if the new playlist is working:
sudo python /home/pi/lightshowpi/py/synchronized_lights.py --playlist=/home/pi/lightshowpi/music/christmas/.playlist
You should hear music synced with lights. You have working lights. Now let’s automate it.
Automate the playback
We are going to use cron jobs to start the playback script at system boot so that it becomes a plug and play device, no need to log into ssh to start the show.
crontab -e
And add following lines at the end:
SYNCHRONIZED_LIGHTS_HOME=/home/pi/lightshowpi

@reboot  $SYNCHRONIZED_LIGHTS_HOME/bin/start_music_and_lights >> $SYNCHRONIZED_LIGHTS_HOME/logs/music_and_lights.play 2>&1 &
Now reboot your Pi to see if it’s working:
sudo reboot
Music and lights should start automatically.
Optional: Add shutdown switch
There is no on/off switch on Raspberry Pi. Once you install your lights outside, it may be outside the wireless range to shut it down from terminal. Simply yanking off power cable will corrupt the OS; so we need to add on/off switch. We will be using a script written by Inderpreet Singh that uses a GPIO pin to send a shutdown command to Raspbian OS.
Create a directory called ‘myscript’ in the home folder of the Pi (of course, you have to ssh into Pi)
mkdir myscript
Then cd to this directory:
cd myscript
And create a file:
nano shutpi.py
Copy the following lines into that empty file:
#!/bin/python
 # Simple script for shutting down the Raspberry Pi at the press of a button.
 # by Inderpreet Singh
 import RPi.GPIO as GPIO
 import time
 import os
 # Use the Broadcom SOC Pin numbers
 # Setup the Pin with Internal pullups enabled and PIN in reading mode.
 GPIO.setmode(GPIO.BCM)
 GPIO.setup(21, GPIO.IN, pull_up_down = GPIO.PUD_UP)
 # Our function on what to do when the button is pressed
 def Shutdown(channel):
 os.system("sudo shutdown -h now")
 # Add our function to execute when the button pressed event happens
 GPIO.add_event_detect(21, GPIO.FALLING, callback = Shutdown, bouncetime = 2000)
 # Now wait!
 while 1:
 time.sleep(1)
Save and close the file. Stay inside the ‘myscript’ directory and set this script to run as root:
sudo python shutpi.py
We now need to set the script to run as system boot:
sudo nano /etc/rc.local
There add the following line between ‘fi’ and ‘exit 0’ line:
sudo python /home/pi/myscript/shutpi.py &
So it looks like this:
# Print the IP address
 _IP=$(hostname -I) || true
 if [ "$_IP" ]; then
 printf "My IP address is %s\n" "$_IP"
 fi
 sudo python /home/pi/myscript/shutpi.py &
 exit 0
Shut down your system and connect a push button to GPIO pin 21 and GND using male-female breadboard cable.

Reboot your system and once music is up and running, push the button; your system should shut down.
Electrical connections for 110v lights
If you are using 110v lights you need receptacles. I used duplex receptacles to keep the size of the set-up small so that I can house it in a waterproof container.
The receptacles that I linked about have a hot side and are neutrally bridged. We need to cut the bridge of hot side so that we can use it independently to plug 8 separate Christmas lights. The hot side of the duplex has golden screws whereas the neutral side has silver screws. Use a cutter plier to break the bridge on the golden side (you can also check this video). It should look like this after breaking the bridge:

Now we will connect the hot side of the receptacles to the output of the relay and neutral to the neutral cable. I have created a diagram to help you with shorting relay and connecting it to receptacles. Please note that in the US, white is the hot wire, black is neutral, and green is ground.

You can use a Four Gang Device Box to pack receptacles in it and use a receptacle wall plate to cover it. You have eight receptacles so you can plug in up to eight 110v lights to the Pi. Just keep in mind that these SSD relays can’t handle too much load so, don’t plug a heavy load into the receptacle. I screwed the entire set-up on a wooden sheet and placed it inside waterproof SOCKit box.
Now you can either put lights on your Christmas tree or decorate your house with those lights.
Credit where due: This tutorial is a result of immense work done by many individuals. Many thanks to Lightshowpi team that created this amazingly cool open source project. I said it earlier and I will say it again, this project would not have been possible without the incredible work of Google software engineer Todd Giles and many others around the the LightShowPi project. That’s the greatness of open source: you learn and benefit from each other. So, special thanks to Tom Enos, Stephen Burning, Benjamin Ellis, and many more. I also want to thank KnC Mc for suggesting how to generate a playlist and thanks to Eric Higdon who actually created the Python script and Ken B for his tips on the automation script. The Lightshowpi community on Google+ is extremely helpful, and if you have any questions, you can freely ask there.
That’s the true open source spirit.